Friday, March 10, 2017

Seville Orange Marmalade


Bitterness is viewed harshly in this overly sweet world. To be bitter is to be consumed with an intense animosity, lashed by the rawness of winter winds, suffering the distress of a galling shame. Yet bitter enemies, bitter rancor, bitter hatred create all the finest elements of great art, surely?

The man chooses bitter in winter, the bitter that is an English dark brown beer. Served at room temperature, which is a surprise to some like the young Spanish woman I saw at an airport bar who wanted to return the pint she’d just bought because it was warm and flat. The barman’s refusal made her bitter  (his explanation that is the way it is meant to be drunk left her confused).


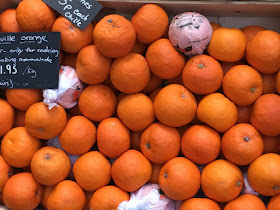
In Brindisa the other day I asked whether their oranges were waxed or not, Spanish citrus being a particular highlight late into winter. Not these ones, the guy said, try this as he handed me a chunk of fresh bread with a generous dollop of marmalade. Amazing – bitter fruit, proper thick shreds of peel, intense jam – quite a mouthful. Being so good on bread not toast was such a surprise I told the man about it that night. He makes weekend breakfast that is always toast - marmalade for him and vegemite for me and coffee for us both. I went back to Brindisa and asked to buy a jar of their very fine marmalade. Ah no madam the nice man said, we sell the oranges and give you this and handed me a small slip of paper, which is how this week I came to make something I’d never done before.

Here is the recipe.

Seville Orange Marmalade

Marmalade can be made with all kinds of citrus and was, indeed, initially made in Portugal using quince but Seville oranges are particularly suited because of the high pectin levels in the pith and pips and, of course, their wonderful bitterness 

Makes about 5 kgs - you need a lot of jars

1.5kg Seville oranges - buy big ones, as it will cut the work down a bit
3 litres water
Juice of 2 lemons
3kg granulated sugar - the weight of sugar is always double that of the fruit

I found it easiest to set up a kind of work station before I started to reduce the amount of sticky mess I was guaranteed to make. You need a BIG preserving pan, mine is 25cm deep with a diameter of 30cm which holds vast amounts. Put the pan on the bench to your left. Next to it put your chopping board, knife and citrus juicer. On the right hand side put a large piece of muslim - at least 30 cm square - on top of a large flat plate. You put all the pips - and there's a LOT of them in Seville oranges - as well as the membrane from the juiced oranges into the muslin, then bring the corners together and tie up the bundle with string before you add it to the jam pan. It is the magic bag that means the marmalade will set when it's done.

Scrub all the fruit with warm water and a clean scourer, then cut each orange in half and squeeze out the juice, piling up the juiced orange halves as you go. Juice the two lemons and discard the shells -  use them to soften your elbows first! 

Tip all the juice into the pan. Pull any remaining membrane out of the oranges and add it to the muslin, along with all the pips.  Bring the edges of the muslin together and tie it tightly with kitchen string so nothing can escape into the pot. 

Slice the orange peel thinly to the size you like, making sure it's fairly consistent. Don't be tempted to remove the pith, it contains a lot of pectin to help the marmalade set.

Add the orange slices to the pan with the juice, the muslin bag containing all the pips and membrane, and the 3 litres of water. Put the pan onto a medium heat and bring it to the boil, then reduce the heat so it simmers gently. Let it bubble away for a couple of hours until the peel is soft and the liquid has reduced by about a third.

Take the pan off the heat and use some tongs to take the muslin bag out. Put it on a plate to cool a bit, then squeeze the bag back over the pan of liquid, catching all the  surprisingly thick juice. Discard the sad sack.

Add the sugar to the pan and, still off the heat, stir it until it is all dissolved.

Return the pan to the heat and bring it back to the boil over a fairly high heat. Boil the jam rapidly for about 15-20 minutes, until the setting point is reached. 

Setting point is what it sounds like, and the best way to test is with a sugar thermometer - when the temperature reaches 105C/220F you're good to go. You can also put a plate into the fridge and,  when the mixture has boiled for 15 minutes, spoon a little onto the cold plate and put it back into the fridge for a minute or two. If the jam then sets enough to wrinkle when you push it with your finger, you're good to go.

Take the pan off the heat, skim off any scum, and then all the marmalade to cool for about 15  minutes so that the peel floats rather than sinks.

Whilst it's cooling wash your jars and lids in warm soapy water then dry them on a tray in the oven at about 160C for five minutes.  Leave them on the tray to fill them, you'll have way less mess!

Fill the still warm jars with hot marmalade and put the lids on tightly immediately. Allow to cool before you label them. Eat with pleasure.

Lots of lovely advice here about how to enjoy the whole marmalade making process.


Monday, February 27, 2017

Rocket Salad, Poached Egg, Toasted Pearled Barley, Grilled Seville Orange and Bacon


So

I saw a recipe online for spinach salad, feta, toasted farro, grilled onions and calabrian chillies and I wanted it. Even with a title as long and ridiculous as that, I thought it sounded seriously edible and properly substantial even for a wet night in February. I think it was the idea of toasting the farro presumably to make it rich in flavour and to give some overall warmth to balance the slightly bitter metallic flavour of the spinach. And, you know I don't use feta enough and I am totally thoroughly in love with blackened onions, hot or cold but best of all just below warm.

But

I didn't have any farro, and the lovely posh Italian shop at Mercato Metropolitano only had it as a mix for soup. Didn't have feta either or, for that matter, any spinach. The salad bowl was looking potentially bleak.

However

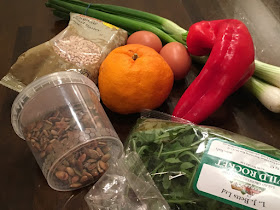
I did have some pearled barley, and half a bag of wild rocket that needed using, eggs because I always have eggs and an airtight tub of toasted pumpkin seeds. Plus there were a couple of pointy peppers that might add a sweet note and a fab flash of colour. To counterbalance the peppers I decided to grill slices of seville orange for a bitter caramel note. And I  thought of bacon - because everything tastes better with bacon.

And

Of course I had no onions but the shop round the corner had bright bunches of spring onions. It was far too cold/dark/bleak/generallyFebruary to cook outside so I dragged the ridged cast iron pan from the bottom of the drawer and thereby set about making an entirely different dinner.

Barley, Rocket and Grilled Orange Salad

Serves 2 for dinner with enough over for lunches next day

250g pearled barley
1 bay leaf
2 pointy red peppers
1 Seville orange
6 spring onions
3 rashers of bacon
A couple of generous handfuls of rocket
A tablespoon of toasted pumpkin seeds
6 tablespoons olive oil
1 tablespoon sherry vinegar
2 eggs

Spread the barley out across a flat oven tray and toast in the oven at 180C/350F/Gas 4 for about ten minutes till the grain colours lightly and smells a bit toasty. I have to say I'm not convinced it had any noticeable contribution to the flavour of the barley so feel free to skip this step if it seems like a faff.

Tip the (toasted or not) barley into a saucepan, add water to cover by a couple of inches, drop in the bayleaf and cook over a medium heat until it comes to the boil. Reduce the heat to a simmer and cook the barely until fairly tender but still with a bit of resistance. This will take about 30 minutes - add a generous teaspoon of salt halfway through. Drain and set aside.

While the barley cooks, roast the peppers whole in the oven at 200C/400F/Gas 5 for 20 minutes or so, turning occasionally, until the skins are blackened and blistered. Put them into a small bowl and cover tightly with clingfilm. The steam will loosen the skins further making them easy to peel. When they are cool enough to handle, strip the skin away and discard it along with the seeds. Cut the flesh into finger sized strips and tip into a large salad bowl.


Heat the grill pan over a high flame. Cut slices across the orange, about the thickness of a thick pound coin, including the skin saving as much of the juice as you can in a small bowl. Discard the many seeds. Brush each slice with olive oil and lay them out in the hot pan to sear, turning them after a couple of minutes to caramelise the other side. Put the cooked slices into the salad bowl till they're cool enough to handle, then cut them into 1 centimetre squares and return to the bowl with the peppers.


Cut the base and scraggy tops off the spring onions and cut each one in half from top to bottom, brush the cut sides with olive oil and put them into the hot pan. Griddle till they start to blacken, turn
them over and cook the other side. Drop them into the bowl with  the peppers and orange.

Next cook the bacon rashers in the hot griddle pan till they crisp as much as you like. Leave them to cool in the salad bowl, then cut into 1 centimetre strips and return to the bowl.

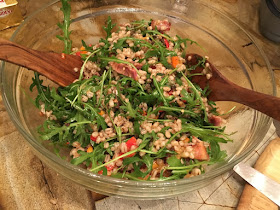
Add the cooked, drained barley and the rocket to the salad bowl. Whisk the olive oil and sherry vinegar into the orange juice you saved earlier (you did remember that, didn't you 😌) and season with salt and freshly ground black pepper. Toss the salad with the dressing - taste and adjust the
seasoning if necessary.


Poach the eggs till the whites are just set and the yolk remains runny. Serve the salad into 2 bowls and top each with a poached egg and a sprinkle of toasted pumpkin seeds.


Dinner is done.

If you go for leftovers for lunch next day - and I would recommend it - it's very good topped with a sliced boiled egg.

Tuesday, February 14, 2017

Chocolate Cardamom Pie

 Valentine's Day today and though - yes! - I subscribe to the notion that every day should be a special day for you and your love, it's nice occasionally to add a little extra sparkle just because you can. The v best sparkle I produced this week was definitely this lightly spiced chocolate pie. It is elegantly simple and simply elegant - and thus, perfect.

Cardamom is an intriguing spice, relative to ginger and distantly also the banana, it is popular in a variety of cuisines. It has delicate flavours of citrus and smoke with sweet notes of eucalyptus in there as well. The Scandis love it in baking, indeed I was surprised to find it is the mystery delight in the fikka cinnamon buns, the Dutch add it generously to spekulaas biscuits and it adds richness to Turkish coffee. It's a key ingredient in Indian cooking, used in everything from curries to sweetmeats and chai.

Split green cardamom pod

It has a long history too as an aid to erotica. Mentioned in Tales of Arabian Nights as a popular ingredient of love potions, allegedly boosting sexual desire in both men and women, inducing a good mood all round. Enticing Herbs and Seductive Spices suggests Arabs add cardamom to beverages and drink the mixture as an aphrodisiac, They also sprinkle powdered cardamom, ginger and cinnamon over boiled onions and green peas to promote erotic vigour. In India, powdered cardamom boiled with milk is consumed with honey at night to prevent impotence and premature ejaculation. Also known as a cure for bad breath, kissing too is made more pleasurable...

So use it with abandon to spice this luscious pie and serve with a generous dollop of creme fraiche to the one(s) you love. You need to make this a few hours ahead as it needs time to set - something I see as a definite positive as there's no last minute panic. A couple of lessons learned I should share - when you've poured the chocolate into the cooked pie case put it into the fridge without covering it. I decided to cover it with cling film which promptly dropped into the dark liquid and messed the perfectly smooth finish. Also use a fine mesh strainer for the cocoa but get the lumps out before you hold it over the pie if you want a reasonable approximation of a light and even dusting.


Chocolate Cardamom Pie

25cm sweet pastry tart case, cooked - I used Paul Hollywood's recipe, highly recommend
10 green cardamom pods or 1 teaspoon ground cardamom
350ml double cream
200g dark chocolate, 80% cocoa solids or thereabouts, broken into smallish chunks
30g unsalted butter
Cocoa powder for dusting the finished tart

If using whole cardamom pods, split them open and drop the little black seeds into a pestle and mortar. Grind them to a fine powder.

Pour the cream into a heavy based pan, add the ground cardamom and bring to just below boiling point over a gentle heat. Take the cream off the heat and add the broken chocolate and the butter. Stir until everything is melted together and leave it to cool for about five minutes. Pour the chocolate cream into the pie case, put into the fridge and leave to set for a couple of hours.

Before serving lightly dust the top with some cocoa powder then serve with creme fraiche and perhaps a strong coffee.


This recipe is an adaptation of one from The flavour Thesaurus, a book I am currently reading with great pleasure.

Thursday, February 09, 2017

Taboon - one kind of flat bread


Have just been in Oz visiting family with the bonus of basking in a little sunshine in the midst of this bleak winter. My parents live in relaxed beachside suburbia on the coast south of Sydney close enough to the surf to hear the waves pounding sand and high enough up to whale watch from the kitchen window whenever the pods migrate. To add to the idyl they are both keen and experienced gardeners and despite (because of?) the salt air they have a beautiful collection of many hued roses at the front and a most magnificent herb garden in a raised bed at the back. As someone who can kill rosemary just by looking at it, I am seriously jealous.

My mother recently planted out half a dozen aubergine seedlings - needless to say they all grow strong and healthy and within a few weeks have set dozens of flowers and the first beautiful glossy fruit is ready. Realising she is about to have a potential glut of what she calls eggplants she requested a sharing of all interesting recipes, whatever the source. Serendipity perhaps but the weekend of my return The Guardian Joudie Kalla's Cook Residency was the story of  rummaniyeh,* a Palestinian dish for aubergine and pomegranate. It earned me double brownie points when I passed it on, having convinced my mother to buy some pomegranate molasses without offering a lot of ideas to use it.

I loved the idea of silky peeled cubes of aubergine melting into the lentil stew, spiked with the visual beauty and sour surprise of pomegranate. The dish tasted as good as it read. I was intrigued to try taboon, too, as the ubiquity of flat breads in the Middle East convinced me they would bring something to the overall dish. I searched about for a recipe and came up with this. I will be honest - I was absolutely seduced by the idea of making my own teeny tiny taboon - the stone ovens traditionally used to cook this bread - I have a garden covered in pebbles.


Taboon - a Palestinian flat bread

1 teaspoon sugar
150ml warm water
15g dried active yeast
250g strong plain white flour
75g strong plain wholemeal wheat flour
Big pinch salt

Dissolve the sugar in the warm water then add the yeast, stir briefly and leave for about five minutes till it starts to foam.

Mix the flours and salt in a large bowl, make a well in the centre and add the yeast liquid. Stir to bring it together, adding a little more warm water if needed to make a pliable dough. Knead the dough on a lightly floured bench for about ten minutes till it is smooth and elastic.

Put the dough into a lightly oiled bowl, cover with a clean cloth and leave somewhere warm for about an hour till the dough has doubled in size. Punch it down, split the dough into four and knead each piece for another minute.

If you want to go the taboon route, heat your oven to its hottest setting. Cover a flat baking tray with pebbles - I washed mine in boiling water first to rid them of their 'gardenness' - and put them into the oven while it heats.

Just with your fingers pull each ball of dough out into a vague approximation of a circle, fairly thin but not too much, you want to end up with nice chewy bread rather than pita style puffs. Put 2 circles of dough straight onto the tray of stones and return to the very hot oven. 


They will cook in a couple of minutes, puffing slightly, picking up a bit of colour. Take the cooked breads out and add the next two. Repeat the process. 

Voila! Done.


The bread was great - the little bit of wholemeal flour added a lovely texture and chewiness. We ate a couple with dinner with the rest in the freezer. They will be perfect with big bowls of soup in the not too distant future.

* A note about the lentil and aubergine recipe - the quantities for the pomegranate molasses are seriously out - there's far too much. I added less than half the 150ml and it made the lentils decidedly sour. A quick google reveals that the 150ml should be pomegranate juice or substitute 2 tablespoons of molasses and the juice of 2 lemons, which I think will make a much better dish.